 SDM Documentation
Field Mapper
Extract values from fields or metadata and map them to other fields
Field Mapper
The Field Mapper transform extracts values from entity fields or metadata and maps them to other fields on the same entity. It supports regex extraction, prefix/suffix wrapping, and provides a live preview of results.
Overview
- Plugin ID:
transform-field-mapper - Input: OneRoster data with fields to remap
- Output: OneRoster data with updated field values
- Best For: Standardizing IDs, adding prefixes, extracting substrings
Why Use Field Mapper?
- Add school prefix to IDs - Your SIS exports user IDs like
12345, but ASM needsSCHOOL01_12345 - Extract codes from metadata - Class metadata contains a
classNumberyou want as theclassCode - Standardize identifiers - Different sources use different ID formats, and you need consistency
- Copy values between fields - Move a course code to the class code field
Configuration: Metadata Mode
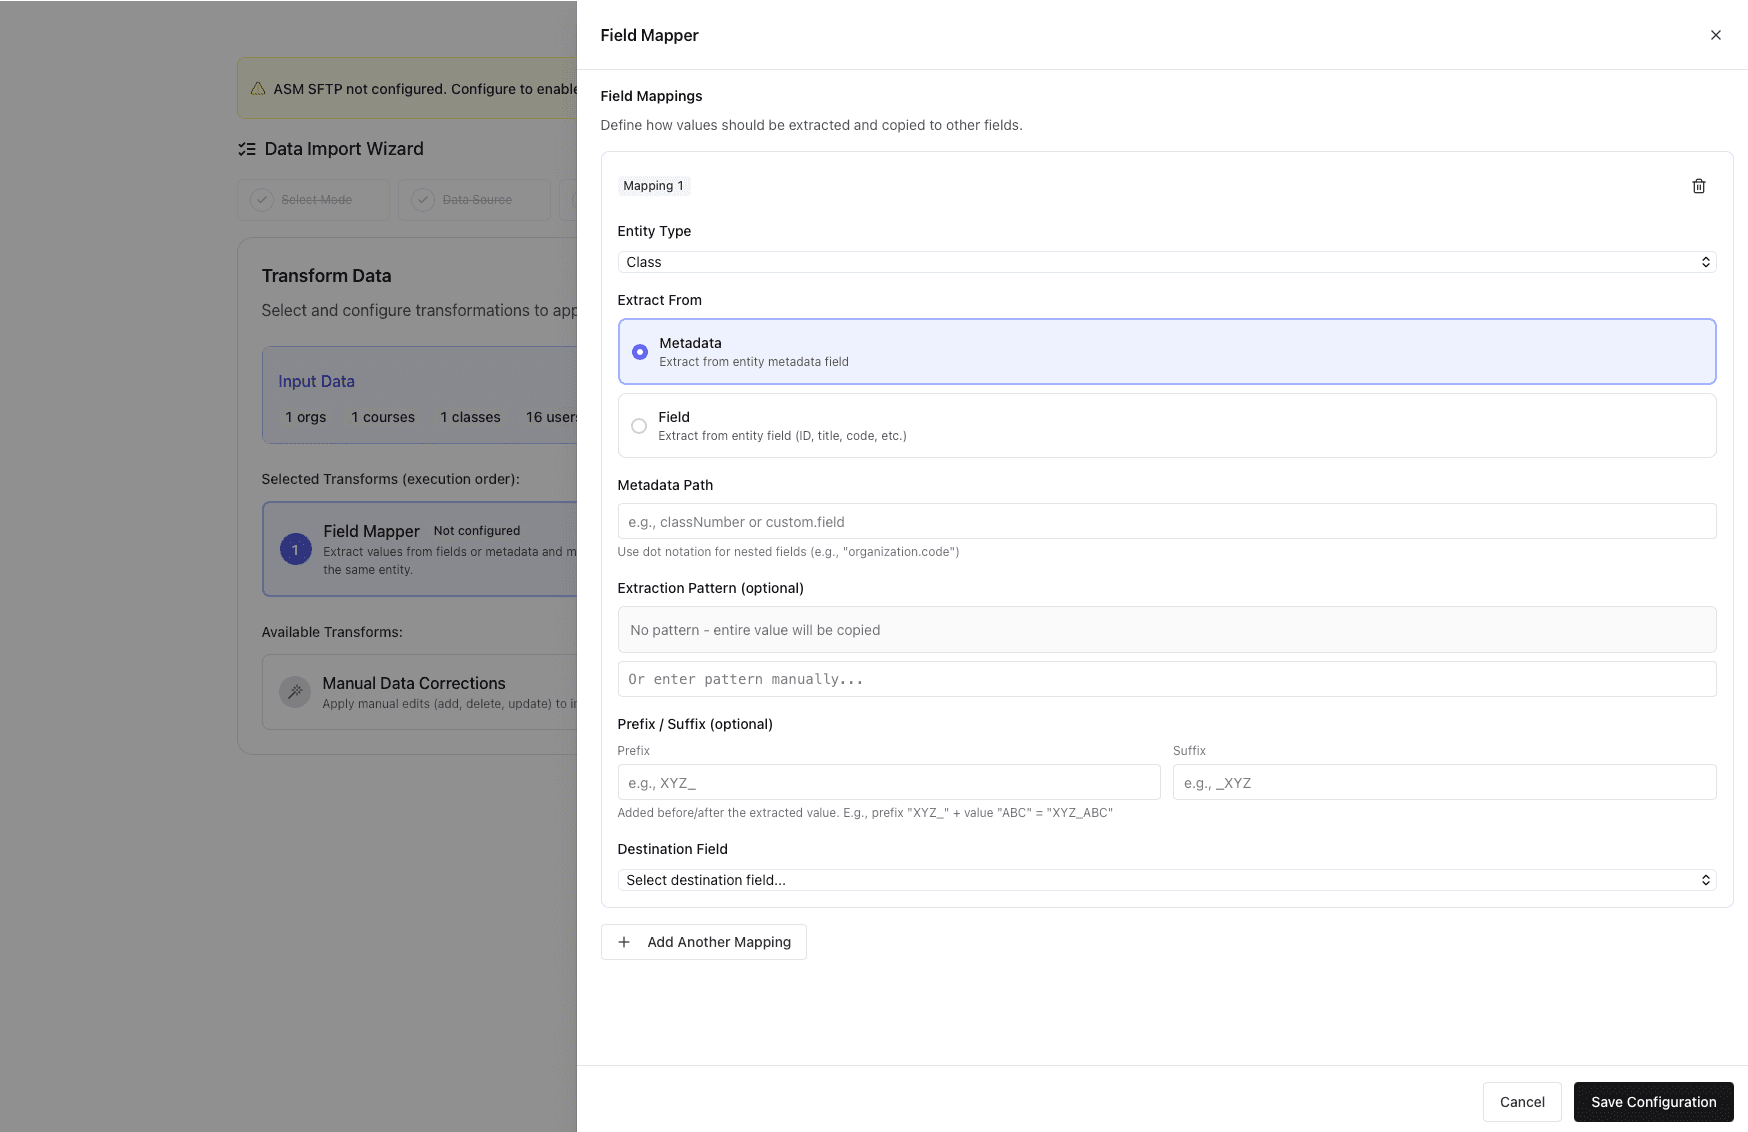
Use Metadata mode when the value you need is stored in an entity's metadata field rather than in a standard OneRoster field.
Configuration: Field Mode
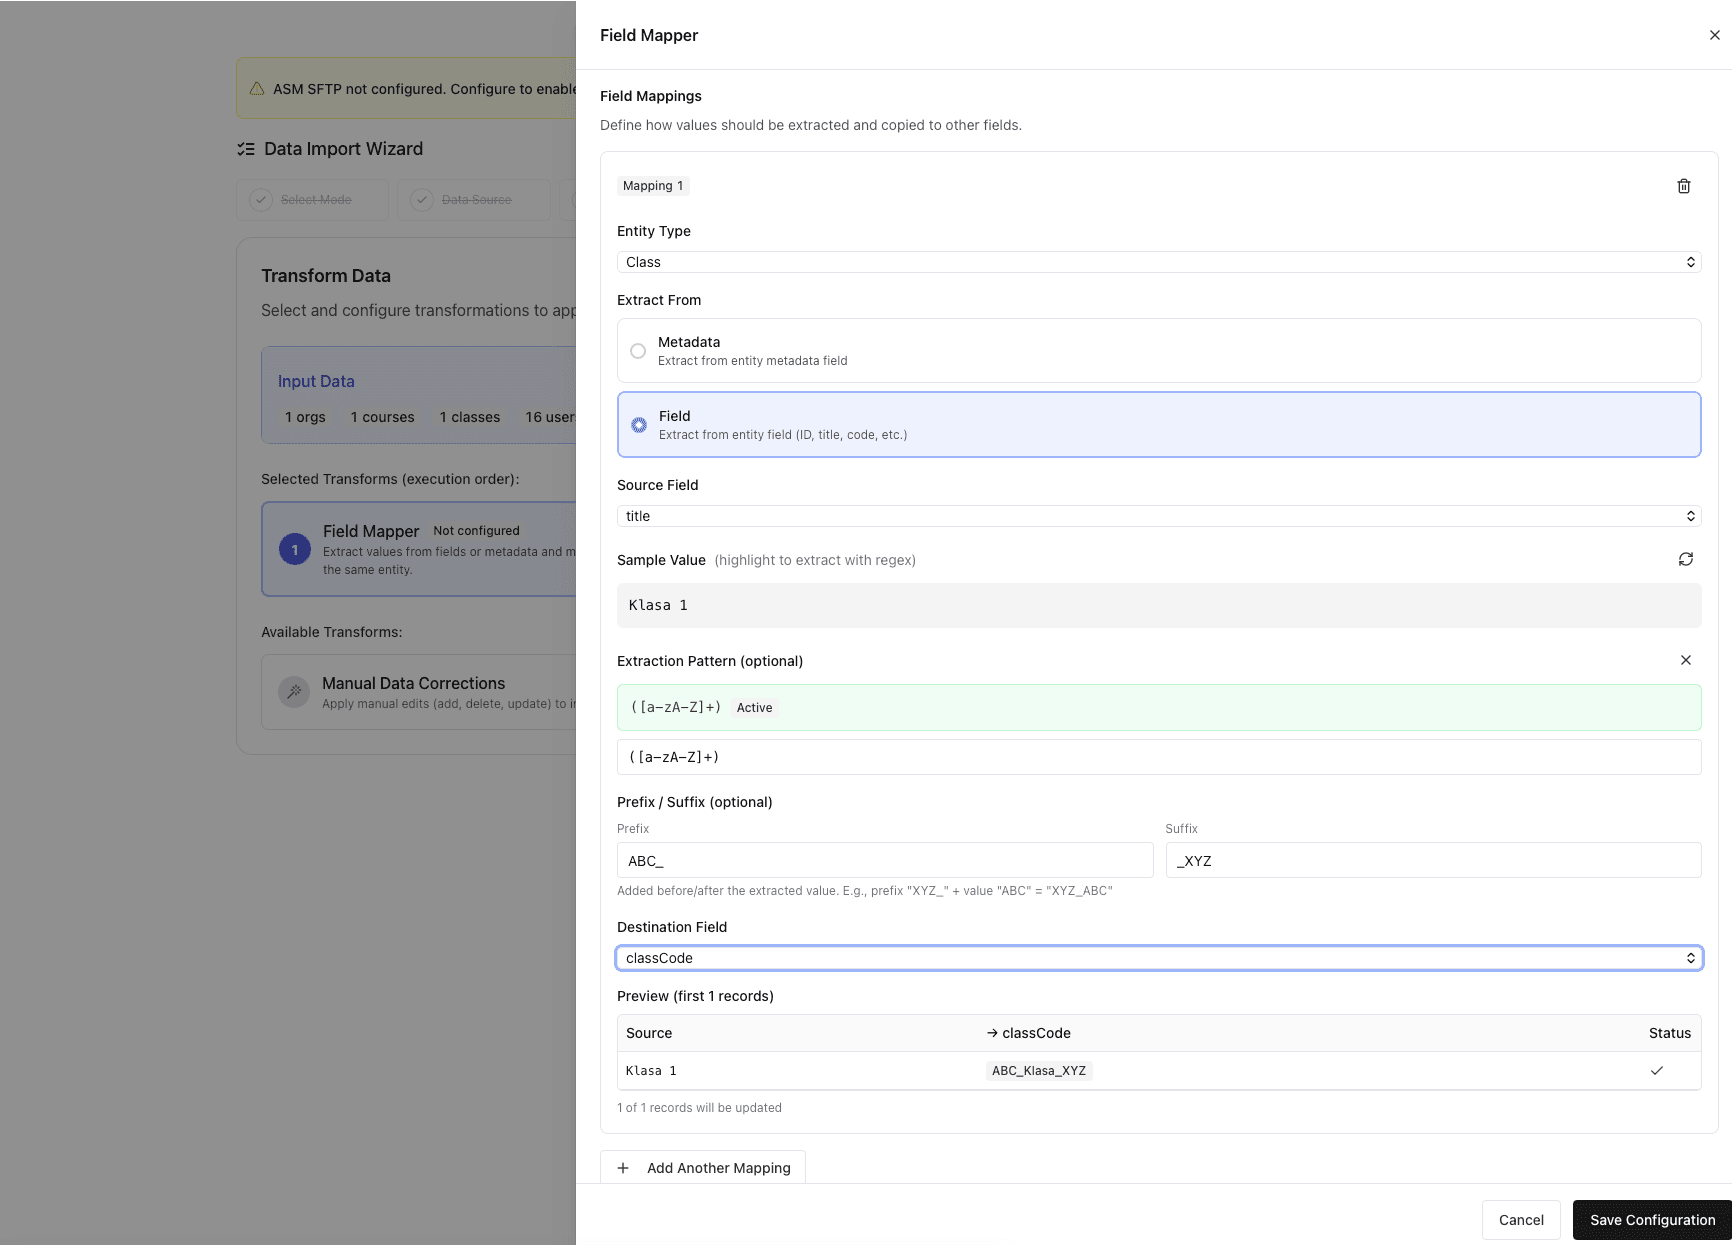
Use Field mode when you want to extract from a standard OneRoster field (title, code, identifier, etc.). This mode shows a live sample value from your data and supports the AI-assisted regex builder.
Form Fields Explained
Each mapping card contains the following fields, from top to bottom:
1. Entity Type
Dropdown at the top of each mapping card.
Selects which type of OneRoster entity this mapping applies to. The choice determines which source and destination fields are available in the dropdowns below.
| Option | Description | Available Fields |
|---|---|---|
| Class | Class/section records | sourcedId, title, classCode, classType, location, grades, subjects, periods |
| Course | Course records | sourcedId, title, courseCode, grades, subjects, subjectCodes |
| User | Student and teacher records | sourcedId, username, givenName, familyName, middleName, identifier, email, sms, phone, grades, password |
| Organization | School/org records | sourcedId, name, type, identifier |
| Enrollment | Enrollment records | sourcedId, role, primary, beginDate, endDate |
Changing the entity type resets the source and destination field selections, since different entity types have different available fields.
2. Extract From
Radio selection with two options. This determines where the mapper reads the source value from.
Metadata
Select this when the value you need lives inside the entity's metadata object. Many SIS systems export additional data in metadata that isn't part of the standard OneRoster fields (e.g., custom IDs, grouping keys, department codes).
When selected, the Metadata Path input appears below.
Field
Select this when you want to read from a standard OneRoster field like title, classCode, identifier, etc.
When selected, the Source Field dropdown and Sample Value display appear below.
3a. Metadata Path (Metadata mode)
Text input — visible only when "Metadata" is selected as the source.
Enter the path to the value inside the entity's metadata object. Use dot notation for nested fields.
| Metadata Structure | Path to Enter |
|---|---|
{ "classNumber": "MATH101" } | classNumber |
{ "organization": { "code": "SCH01" } } | organization.code |
{ "custom": { "dept": { "id": "D5" } } } | custom.dept.id |
If the path doesn't exist on an entity, that entity is skipped (no error, the field is simply left unchanged).
3b. Source Field (Field mode)
Dropdown — visible only when "Field" is selected as the source.
Choose which standard OneRoster field to read from. The available options depend on the Entity Type selected above.
For example, with Entity Type set to Class, you can choose from: sourcedId, title, classCode, classType, location, grades, subjects, periods.
4. Sample Value (Field mode only)
Read-only display — appears automatically after selecting a Source Field, showing the value from the first record in your data.
In the screenshot above, with Source Field set to title, the sample value shows Klasa 1.
This serves two purposes:
- Verify you're reading from the correct field
- Highlight text to trigger the AI regex builder (see below)
Click the refresh icon to reload sample data if your source data has changed.
To generate a regex pattern automatically: select text within the sample value by clicking and dragging. SDM will use AI to create a pattern that captures your selection.
5. Extraction Pattern (optional)
Regex display + text input for defining an extraction pattern.
If left empty, the entire source value is copied as-is. If a pattern is provided, only the captured portion is used.
The field has two parts:
- Status display — Shows the active pattern with a green "Active" badge, or "No pattern - entire value will be copied" when empty
- Manual input — Type or paste a regex pattern directly
How regex extraction works
The pattern uses JavaScript regular expression syntax. If the pattern contains a capture group (parentheses), the first captured group is used. Otherwise, the full match is used.
| Source Value | Pattern | Extracted Result |
|---|---|---|
Klasa 1 | ([a-zA-Z]+) | Klasa (first capture group: letters only) |
Math-Grade7-Section1 | Grade(\d+) | 7 (digits after "Grade") |
SCH-001-A | ^([^-]+) | SCH (everything before first dash) |
Klasa 1 | (empty) | Klasa 1 (entire value copied) |
Click the X button next to "Extraction Pattern" to clear the current pattern.
If the regex doesn't match a particular record's value, that record is skipped — its destination field is left unchanged. Check the Preview table to verify match rates.
6. Prefix / Suffix (optional)
Two text inputs side by side — Prefix on the left, Suffix on the right.
Text entered here is added before (prefix) and/or after (suffix) the extracted value. This is applied after regex extraction.
The processing order is: Source Value → Regex Extraction → Prefix + Result + Suffix → Destination Field
Examples
| Source Value | Regex | Prefix | Suffix | Final Result |
|---|---|---|---|---|
Klasa 1 | ([a-zA-Z]+) | ABC_ | _XYZ | ABC_Klasa_XYZ |
12345 | (none) | SCHOOL_ | (none) | SCHOOL_12345 |
Math 7 | (\d+) | G | -MATH | G7-MATH |
For simple cases like adding a school code prefix, you don't need regex at all — just set the Prefix field and leave the pattern empty. The entire value will be prefixed.
7. Destination Field
Dropdown — selects which field on the entity receives the final result.
The available options are the same fields as the Source Field dropdown (determined by Entity Type). You can write to the same field you read from (e.g., prepend a prefix to identifier and write back to identifier), or to a different field (e.g., extract from title and write to classCode).
Once you select a destination field, the Preview table appears below showing how your data will be transformed.
8. Preview Table
Read-only table — appears once both source and destination are configured.
Shows a side-by-side comparison for the first records in your data:
| Column | Description |
|---|---|
| Source | The original value from the source field/metadata |
| → [destination] | The transformed value that will be written (shown as a green badge) |
| Status | Checkmark for successful extraction, X for failed/skipped |
Below the table, a summary line shows the match rate: e.g., "1 of 1 records will be updated".
Records where extraction fails (regex doesn't match, metadata path doesn't exist) show an X status and are left unchanged — they won't lose their existing data.
Adding Multiple Mappings
Click + Add Another Mapping at the bottom to create additional mappings. Each mapping is independent and processed in order.
Use the trash icon in the top-right corner of any mapping card to delete it.
Conflict Resolution
If two mappings write to the same destination field on the same entity, the first mapping wins. Subsequent mappings targeting the same field are skipped with a warning logged during execution.
To avoid conflicts, ensure each destination field is targeted by only one mapping, or order your mappings so the preferred source comes first.
Saving
Click Save Configuration to save your mappings. Click Cancel to discard changes.
After saving, the Field Mapper node in the transform list updates from "Not configured" to show your mapping count. You can then proceed to preview your data to verify the transformations.
Best Practices
- Preview before running - Always check the preview table to verify extraction results
- Start without regex - For simple prefix/suffix operations, skip the regex entirely
- Use the AI regex builder - Highlight text in the sample value to auto-generate patterns
- Test regex manually - For complex patterns, type them in the manual input and verify against the preview
- Order mappings carefully - First-wins conflict resolution means the order of mappings matters
- Check match rates - The preview summary shows how many records will be updated; investigate low match rates